Machine Binding
Today I am going to show you a quicker way to bind your quilt – by machine. Sometimes when I am in a hurry (like this week trying to finish all my quilting tasks before heading off to QuiltCon), a machine binding is just what I need!
It took me a total of 2 hours to bind this quilt using my home sewing machine. I love how it looked outside today with the quilt against the cloudy sky. A cool juxtaposition…
Step 1 – Trim Your Quilt (10 Minutes)
Before binding, you want to start with a nicely trimmed edge, flush with your quilt. I don’t leave any batting peaking out. My method ends up with a fully stuffed, flat binding.
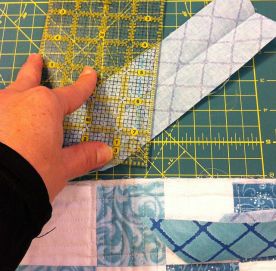
Using a large square ruler, I trim up all 4 corners first. If anything is out of alignment, I gently tug it back into place. Then I trim up all the sides with a long ruler.
By starting with trimmed corners, I can match up the cutting lines so that things stay straight (as possible). You can throw your trimmings away or recycle them as pillow stuffing. 🙂
Step 2 – Calculate the Length of Binding Needed & Cut Strips (10 Minutes)
My favorite binding is called double fold straight grain binding, and it is super easy to make. You start off with strips of fabric, cut them on the straight of grain, then fold them in half twice to get the double fold. It holds up well especially on quilts that get a lot of use.
First, measure the perimeter of your quilt and add on 10 inches for corner folding, seams and “insurance.” In this case, my Sea of Squares quilt measures 50″ x 58″. It shrunk about 2 inches due to the intensity of the quilting on it.
I need a total length of 226 inches (50+50+58+58+10). If I divide this by 40 inches (the length of a fabric strip), I end up with 5.65 strips which I round up to 6 binding strips needed for this quilt. I cut all my strips 2.25 inches wide.
For those of you sewing along using one of my Sea of Squares kits, binding fabric is included.
Step 3 – Sewing the Binding Strips Together (5 Minutes)
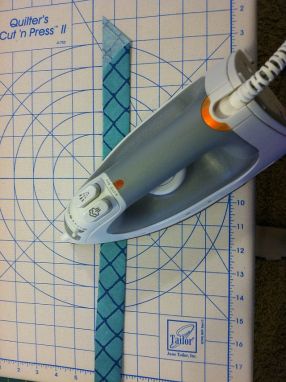
Join all of your binding strips into one long piece. Sew the ends on a mitered angle so that the bulk of the seam will be distributed more evenly. Be sure to cut one end of the binding on the same 45 degree angle. Fold the strips wrong sides together and press along the length with a dry iron.
Before attaching to the quilt, I will pin part of the binding to one side, starting somewhere in the middle. Loosely walk the binding all the way around the quilt to ensure there will not be any mitered seams falling on the corners of your quilt.
Step 4 – Attaching the Binding to the Quilt (30 Minutes)
 Whether finishing the binding by hand or machine, this part is the same. Using coordinating or matching thread in top and bobbin, sew the binding to the front side of the quilt.
Starting with the binding on the angled end, leave a few inches of unsewn “tail” and use quarter-inch seams.
Be sure that you are sewing with the raw edges of the binding and the raw edges of the quilt in the seam. These will be covered with you flip your binding to the back.
You may wish to add a few pins to secure.
When you near a corner, be sure to mark a line 1/4″ away from the corner. Stop sewing at this line, then turn your quilt 90 degrees and sew off the edge.
Flip the binding strip to create a 45 degree angle, pinch the excess, and then fold it back down. This creates the excess fabric allowing for a nice miter on both front and back of the quilt. Begin sewing the next side starting at the corner of your quilt. Repeat for all 4 corners.
Leave about 6 inches of tail when you finish sewing. This will be joined next to create a continuous binding.
Step 6 – Joining the Ends Together (5 Minutes)
This is probably the trickiest part of the whole binding process. You want the ends to be joined with a nice miter seam that does not give any extra slack.
Open both tail ends. Place the angled tail on top of the blunt tail and draw an erasable line along the edge of the angled tail where it meets the blunt end. You will need to account for both seam allowances, so cut 1/2 inch away from this line, keeping the 45 degree angle.
Now join the two ends together with 1/4″ seam. Use pins if needed and offset each of the triangle tips by about 1/4″. Finish attaching the binding to the front of the quilt.
Step 7 – Binding by Machine (1 Hour)
I have a tendency to pull on my binding as I’m sewing, stretching it and creating a wavy edge that needs to be blocked. By pinning first, this can eliminate most of the stretching.
There are several different ways you can finish stitching the binding on by machine. For example, you can stitch in the ditch from the front side but only if you are absolutely sure you are catching the binding on the backside, too. You can stitch using straight lines or decorative stitches. Just sew slowly and be sure to catch the corners as you go around the quilt. A decorative stitch can hide a lot of mistakes!
For Sea of Squares I chose to use a reverse blanket stitch (similar to the regular blanket stitch I used for my machine applique table runner). The stitching won’t line up perfectly on the back but if you use a blending thread it won’t matter too much.
Often times I have finished by quilting a decorative stitch from the backside, too.The picture below shows the binding I did on my first quilt-along, the Jolly Jelly Roll Quilt. I used one of my favorite stitches on my machine, a wavy serpentine stitch.
 I hope you have enjoyed following along as I made my Sea of Squares Quilt. I learned a lot from it and I encourage you to give this quilt a try. If you are currently working your way through your own version of Sea of Squares, I’d love to see it! You can share photos of your work in progress on my flickr group: Christa’s Quilt Along.
Here is a picture of the back of Sea of Squares, showing all that machine quilted texture.
Complete Quilt-Along Schedule for Sea of Squares
Click any of the links below and follow along at your own pace.
- Week 1 – Supply List
- Week 2 – Sorting and Cutting the Charms
- Week 3 – Sewing the Blocks
- Week 4 – Completing the Quilt Top
- Week 5 – Piecing the Backing
- Week 6 – Basting
- Week 7 – Machine Quilting
- Week 8 – Optional Extra Quilting
- Week 9 – Machine Binding to Finish
Sharing is Caring
Please share your work in progress in my facebook group: Quilt With Christa . 🙂


I’m so using the wavy serpentine stitch on the binding of my next quilt! Thanks for the great idea!
Beautiful quilts!
Nice tute. Love, love the quilt!
I’m sure you already know this but will mention it just as a reminder…..if you cut your binding (or sashing) fabric the “length” of your fabric in stead of the width you won’t have to worry about stretching. It takes a little more fabric but certainly makes life easier.
I just found your blog today and am glad I did. I’ll be following.
Enjoy the rest of your week!
Thanks for the tip – that’s a great idea!
I am impressed by your Sea of Squares quilt, it is really charming.
Thanks for sharing, Christa. It is always nice to see another option for machine binding. I like your creative ways! Your quilts and your quilting are lovely!