This is the final part of my “making of” series for Terrace Tiles. I hope you’ve enjoyed the journey and are inspired to make your own version! See below for info about these quilts and the previous progress posts.
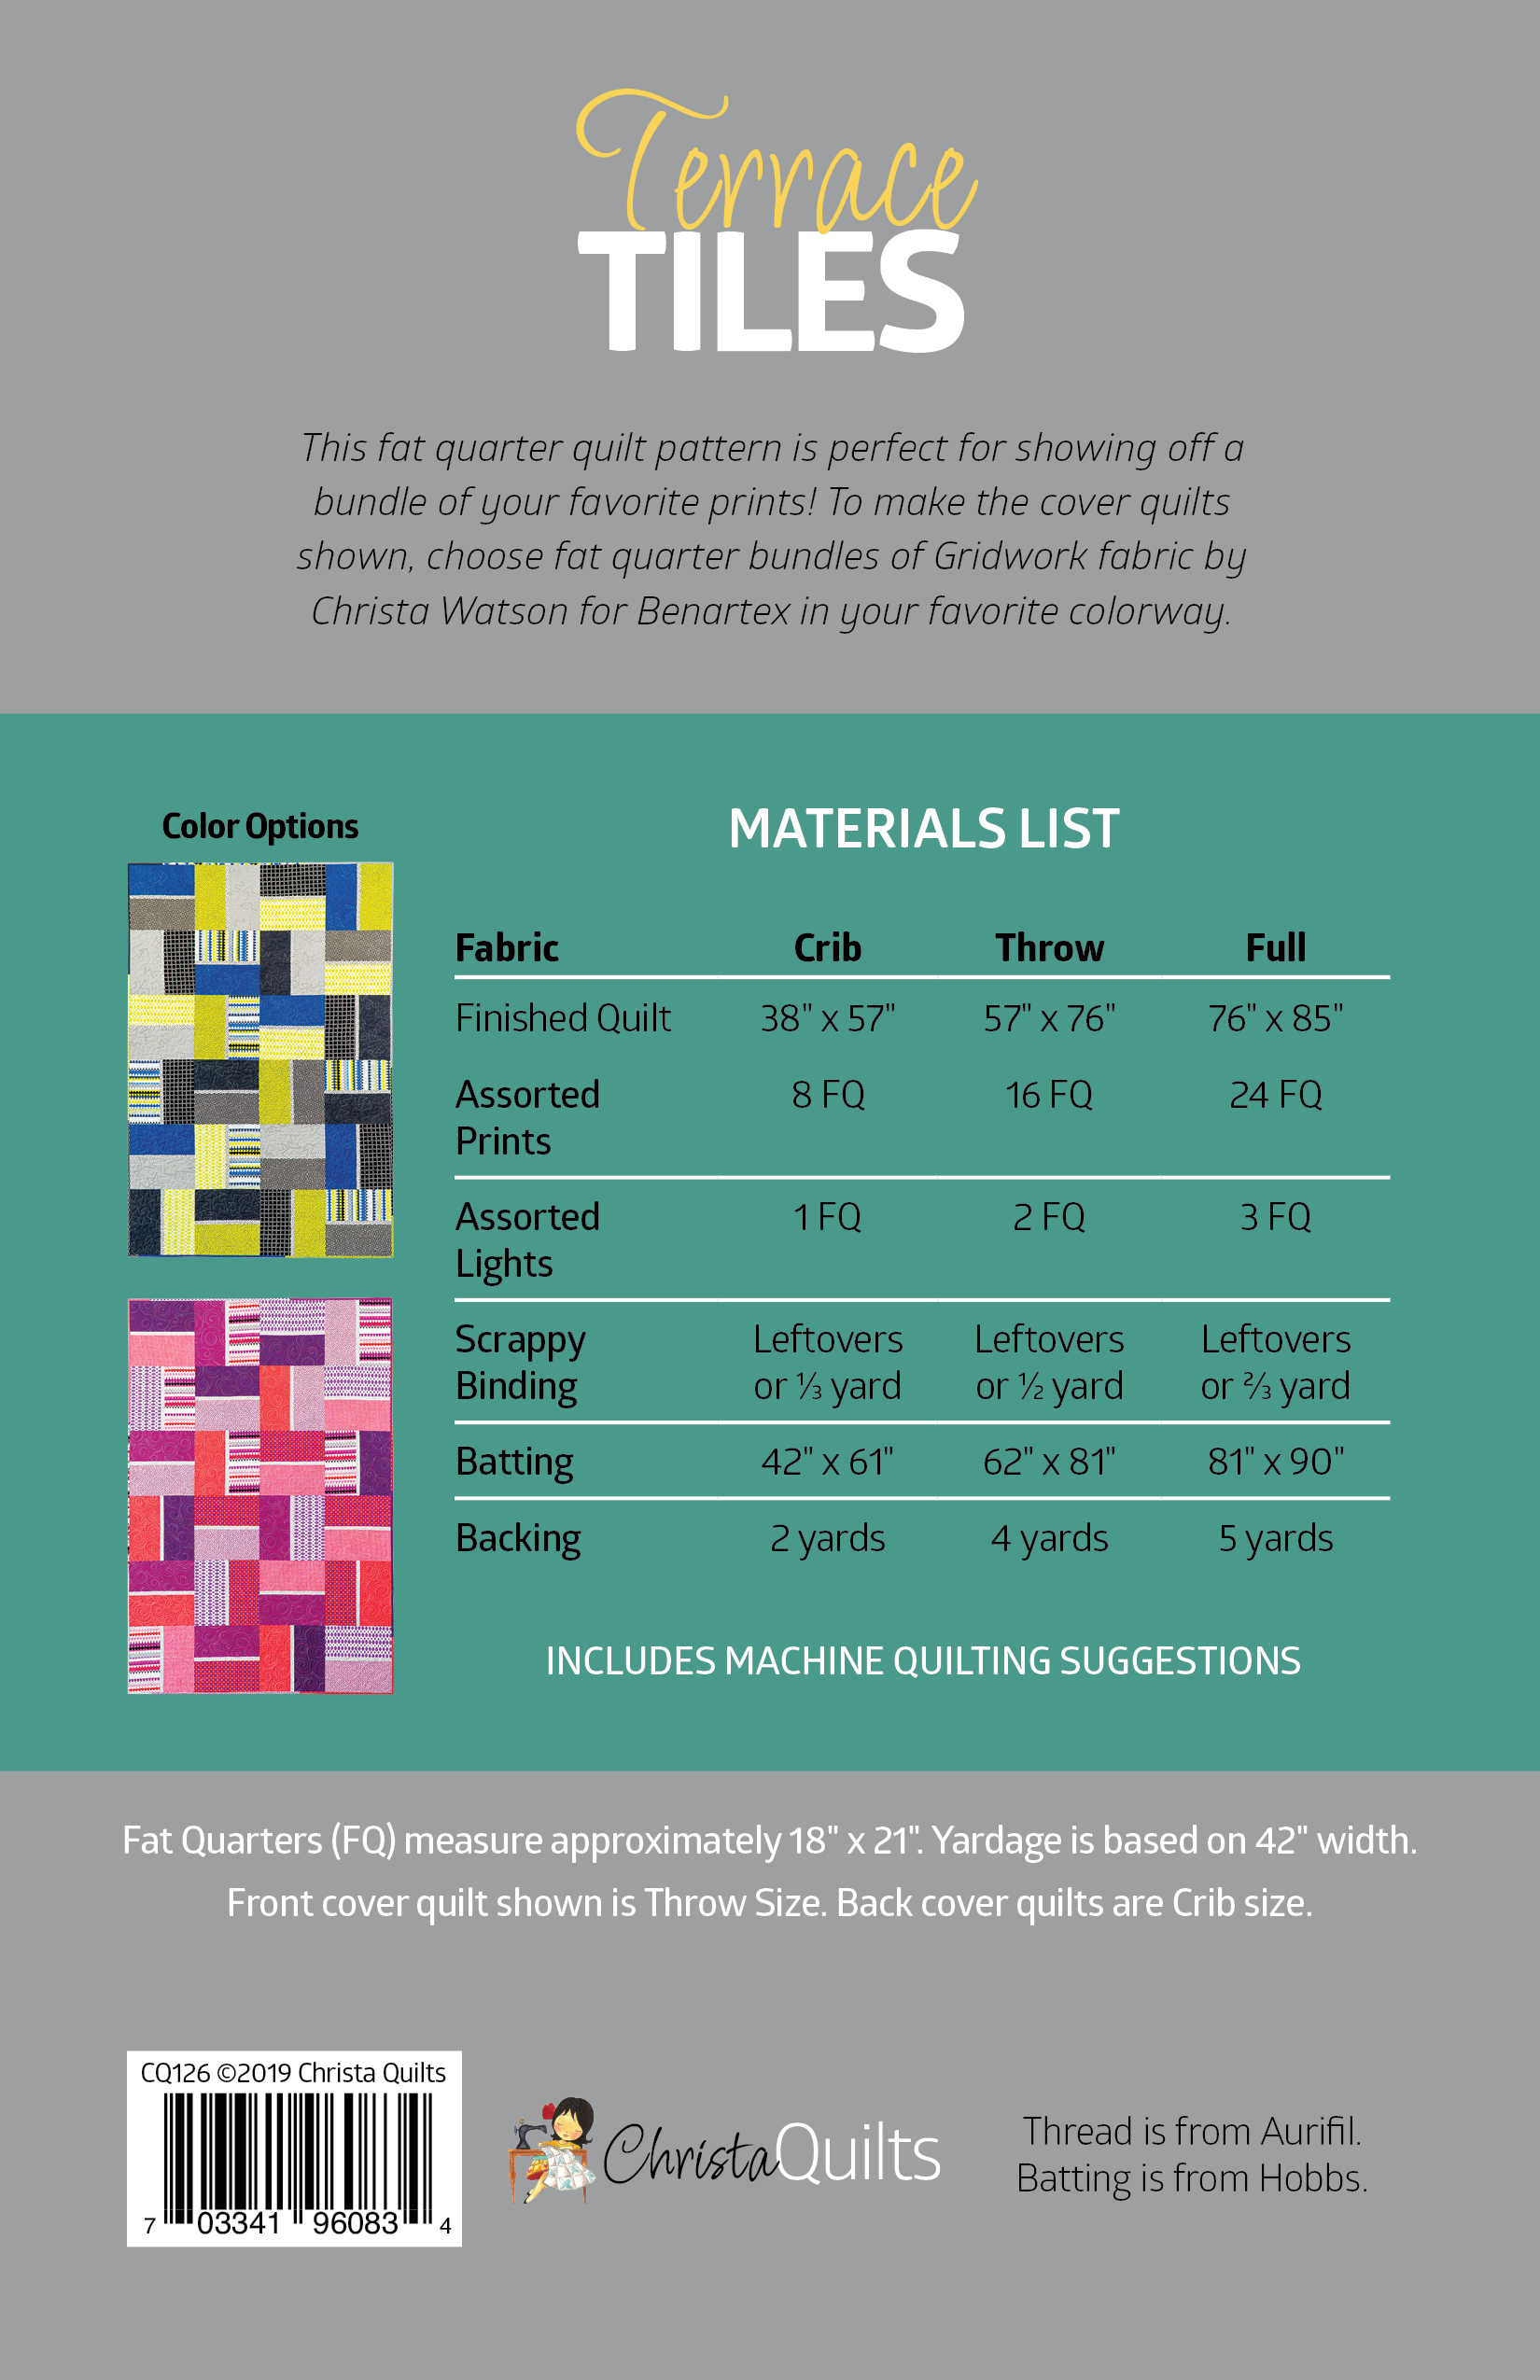
Terrace Tiles Finished Quilt Stats
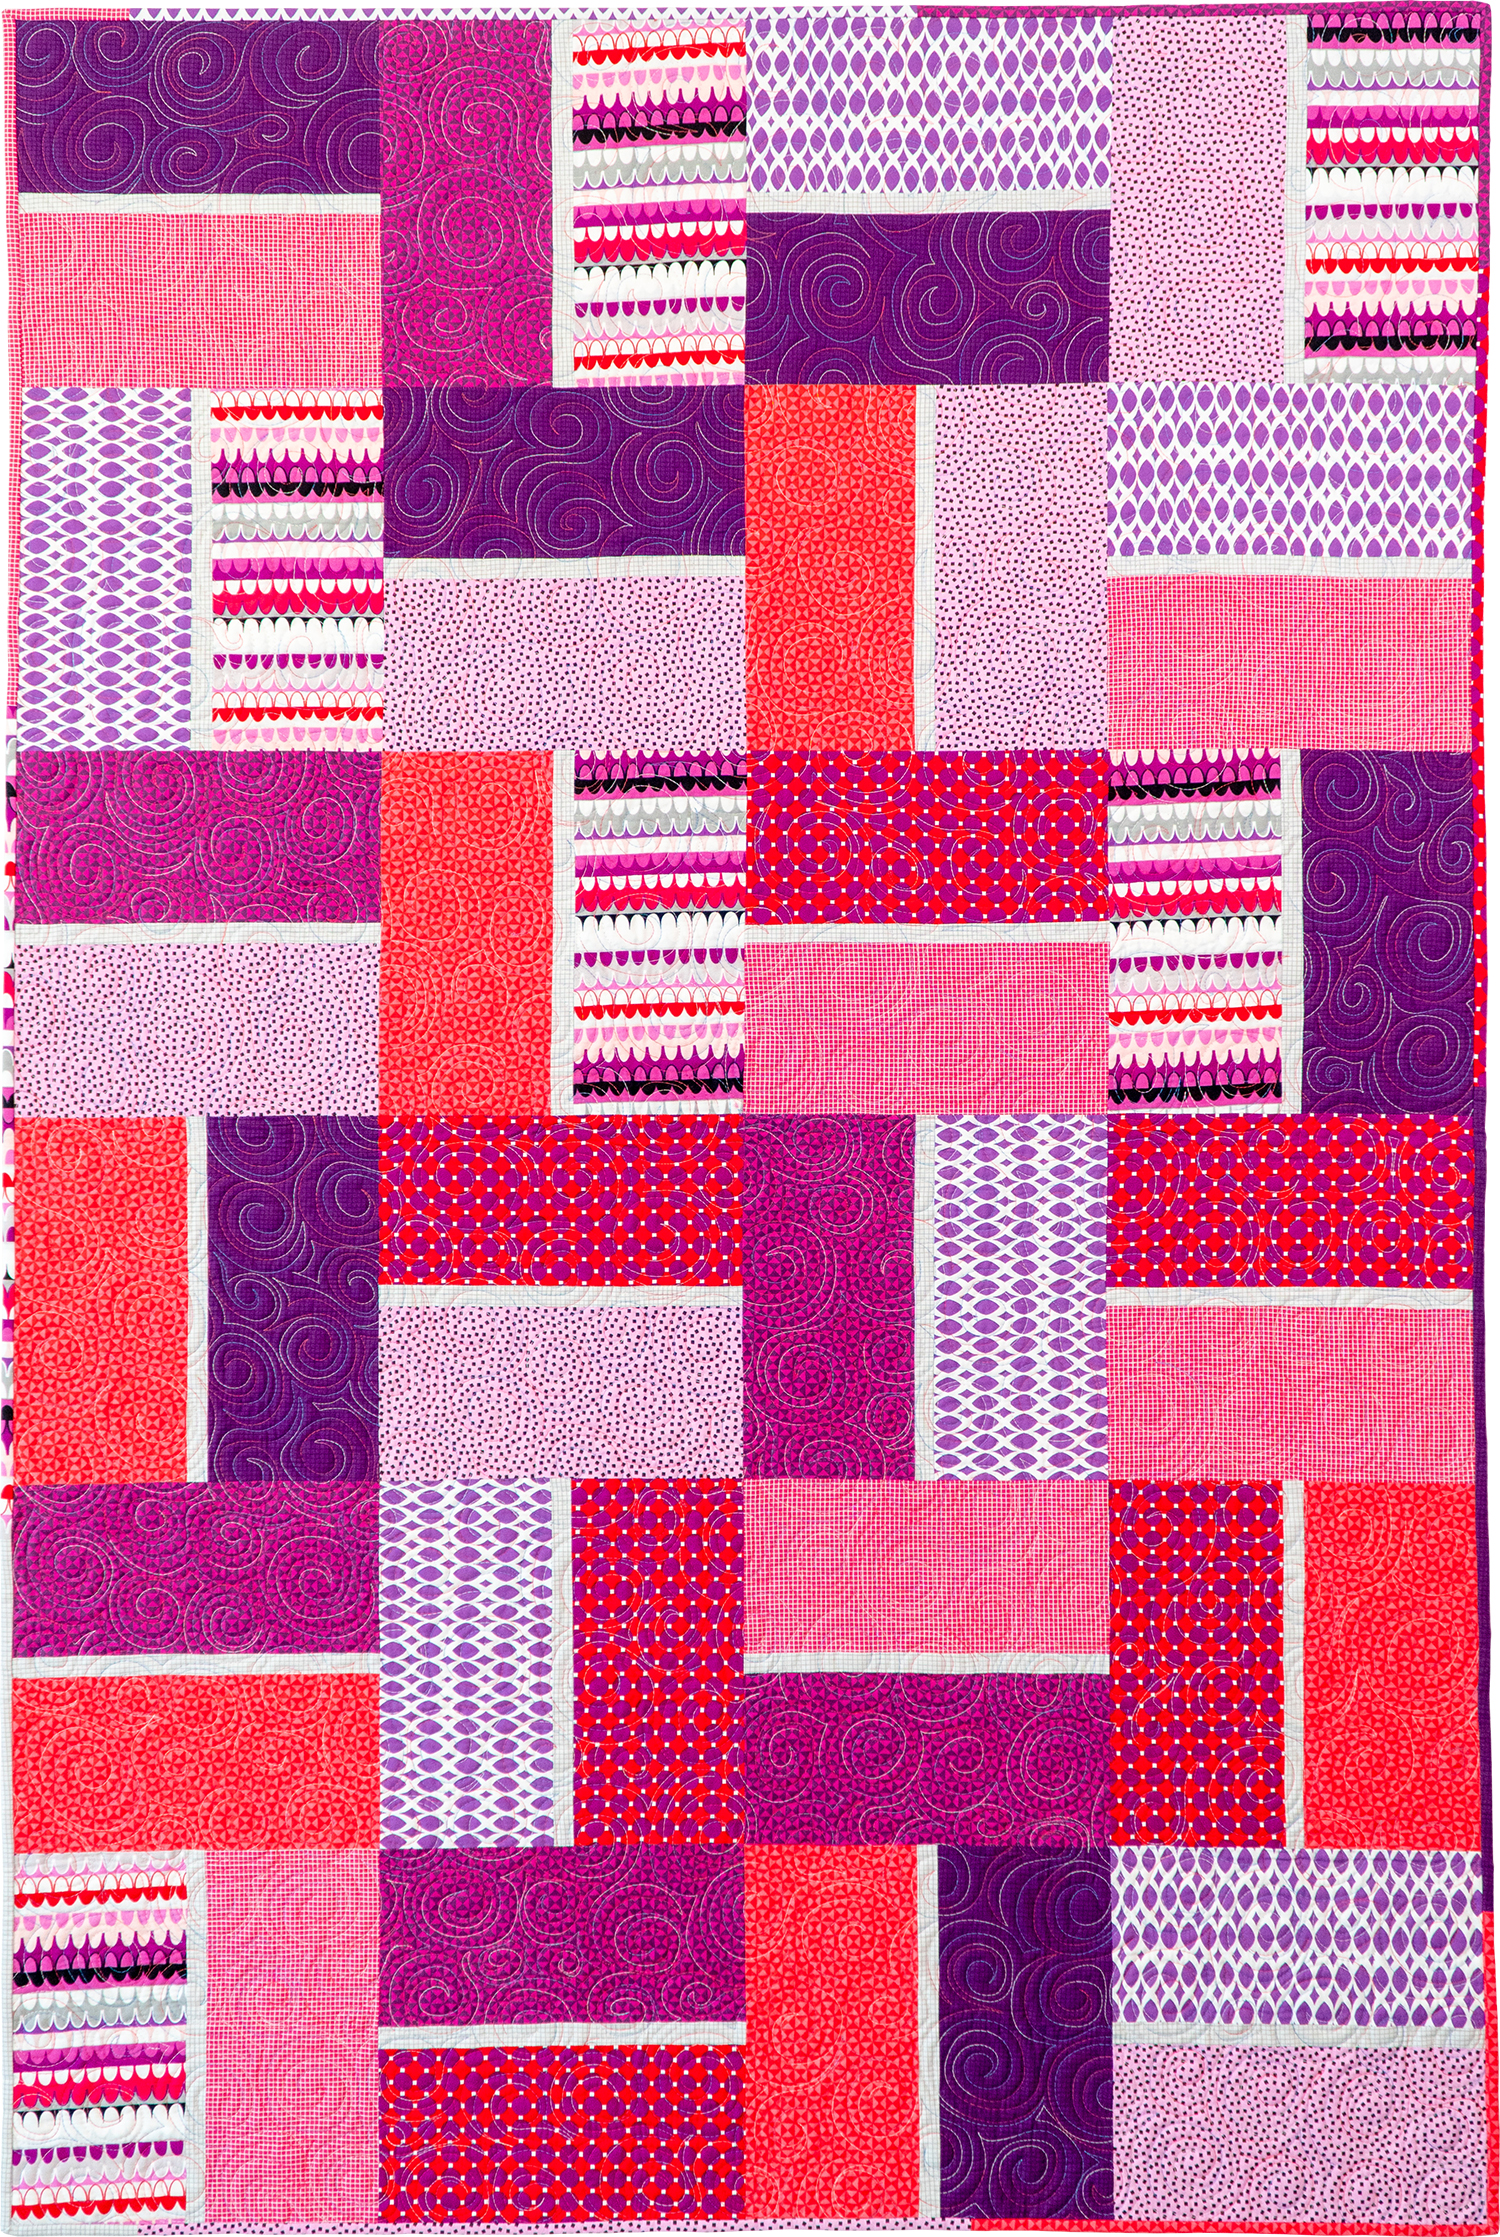
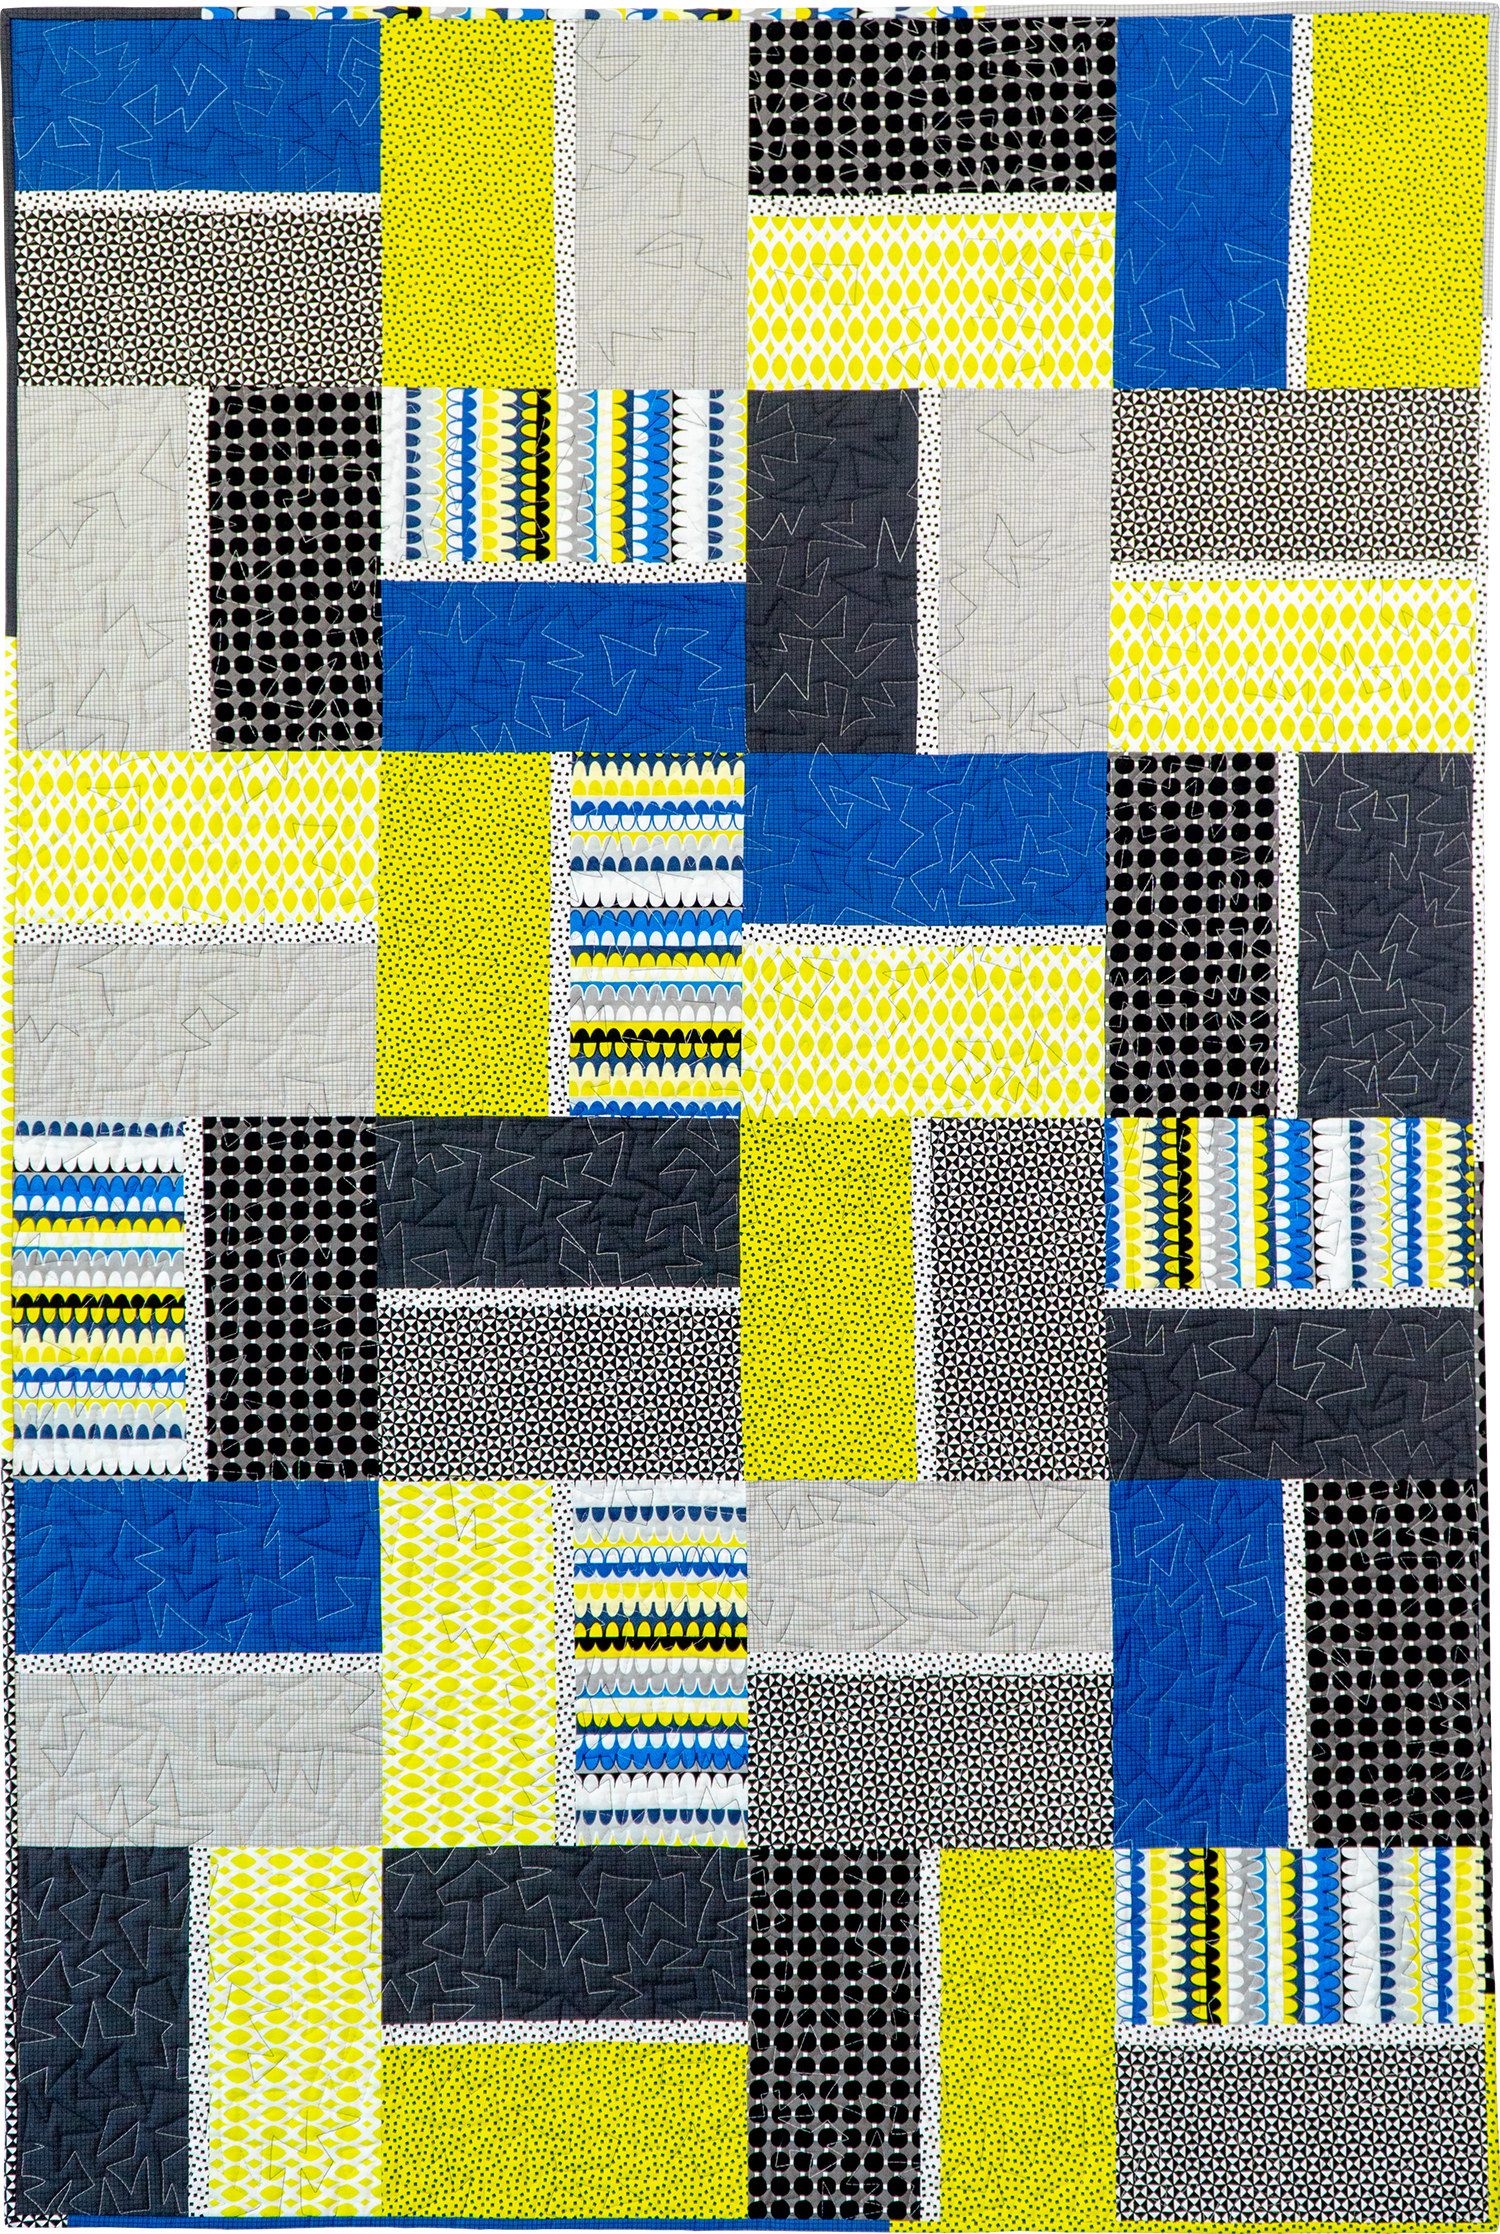
Finished sizes: Amethyst and Citron 38″ x 57″; Breeze 57″ x 76″
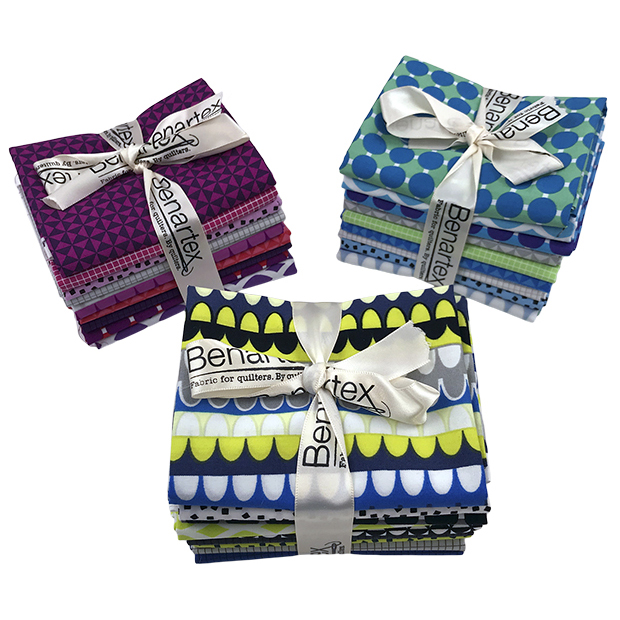
This week, Benartex is promoting my new Gridwork fabric on their social media channels. Along with that, they run a weekly Win-it Wednesday promotion. Today is your chance to win a fat quarter bundle of Gridwork + 2 of my quilt patterns made from it.
To enter, head over to @benartex_fabrics on instagram and leave a comment there. You must follow both Benartex and me @christaquilts on instagram to win. Contest is open until Tuesday, February 18th at 11:59 pm EST. Three winners will be announced on Wednesday, February 19th on the Benartex social media account.
And now we come to everyone’s least favorite part of making a quilt – basting!! But really, if you just set aside the time to do it’s not that bad! Here’s what both versions of Pieced Primose look like up on my design wall that also doubles as my basting area. Read on for helfpul ways to tackle this part of the quilt-making process. It’s easier than you think!
Because I wanted to include all 10 warm or cool fabrics from Abstract Garden in both colorways of Pieced Primrose, I used 9 fabrics for the blocks, and then the multicolor print “Raised Beds” for the backing and binding. The wall size kit includes the backing; for the larger size you’d need 6 yards of either color.
I’ve basted my quilts many different ways over the last few years, and I try to share as much about the process as I can. So take a look at the different tutorials below from prior quilts I’ve made. I’m sure one of them will make your quilting life easier!!
This is the first full-fledged basting tutorial I’ve created for my YouTube channel. I filmed and edited it while making my Infrastructure quilt. In reality it takes about an hour to do, but with the magic of edting, you can watch on super speed which only takes about 7 minutes. Too bad I can’t baste that quickly in real life, right??
If you don’t have a dedicated design wall, no problem! You can still do my spray basting method using a table. It’s the method I used when making my Improv Squares quilt:
Finally, here’s the way I USED to baste my quilts until about 5-6 years ago – using safety pins! It’s still a good method if basting spray isn’t your thing.
If you have another method you prefer, feel free to share you tips or links in the comments for others to see. Until next week – happy piecing and basting!!
LINKS AT A GLANCE
Click the links below for supplies needed to make this quilt:
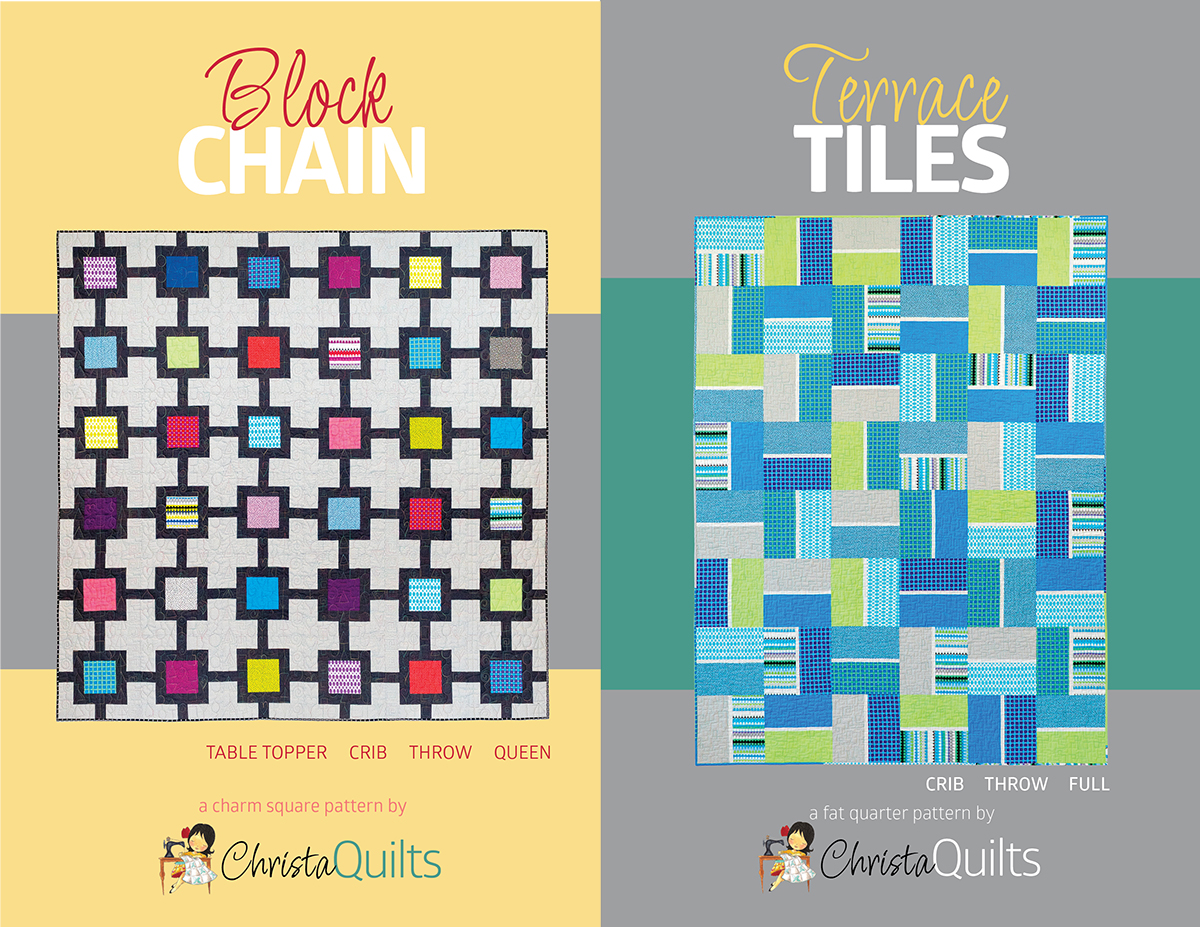
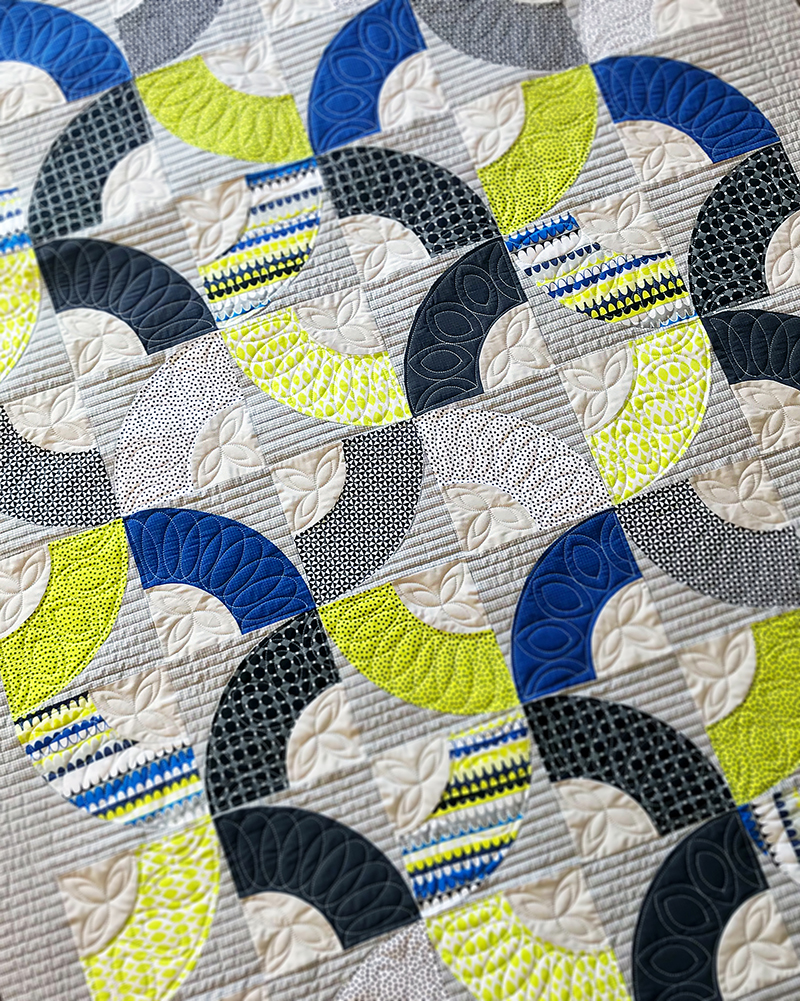
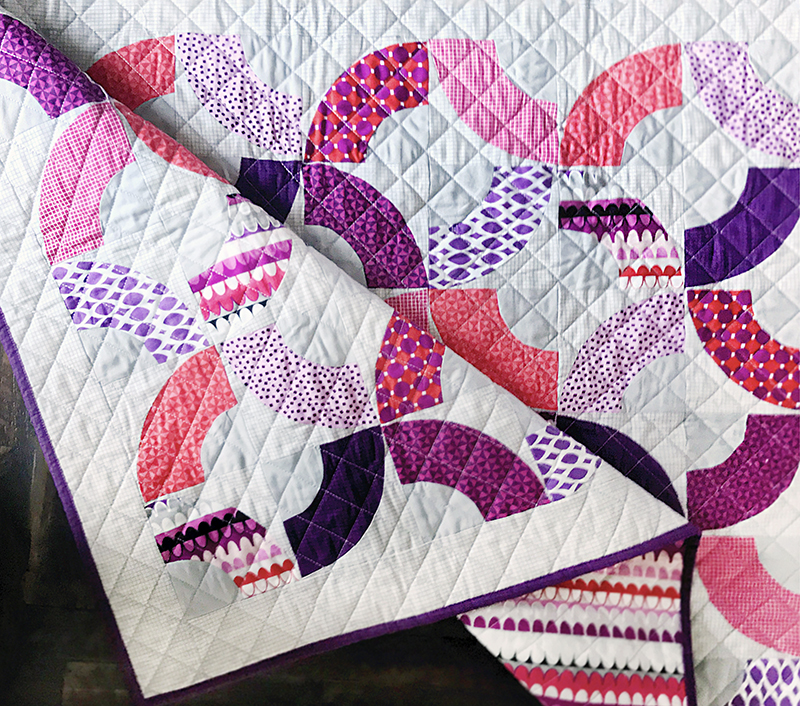
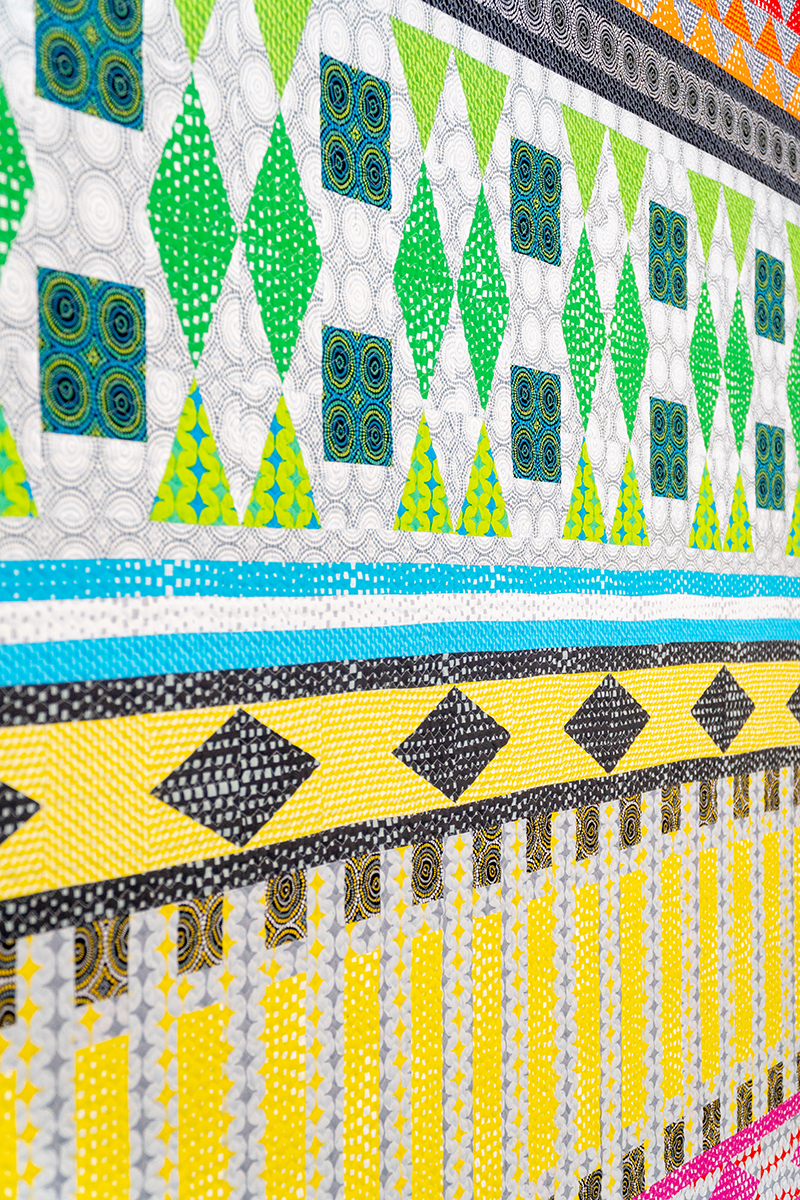
Today I’m excited to share some machine quilting tips and videos for all 3 versions of my Terrace Tiles quilts. My thought is why make one quilt when you can make 3 in almost the same amount of time, right?? LOL!!
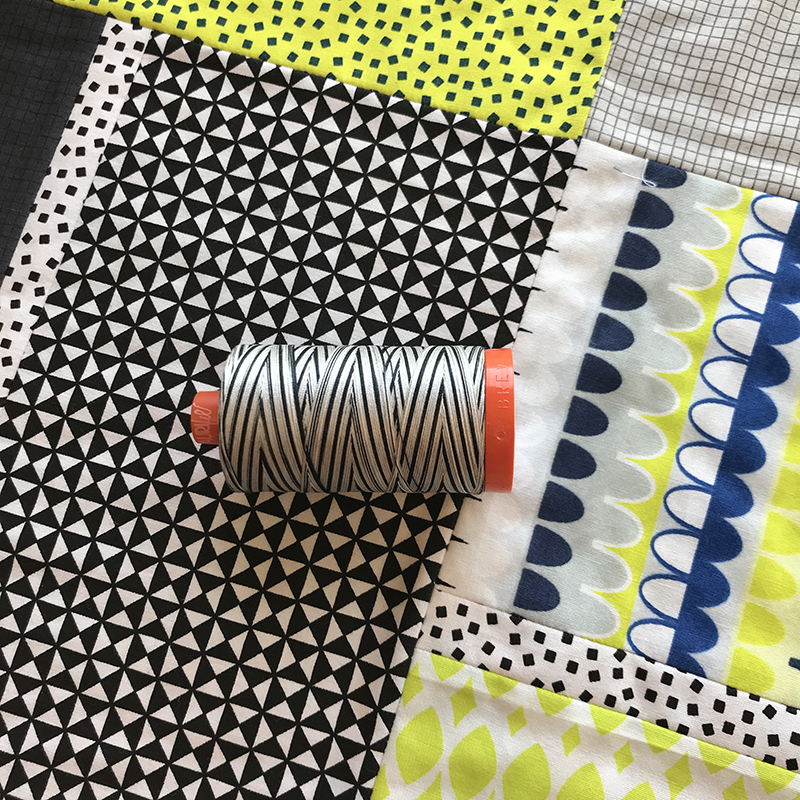
Choosing Thread colors
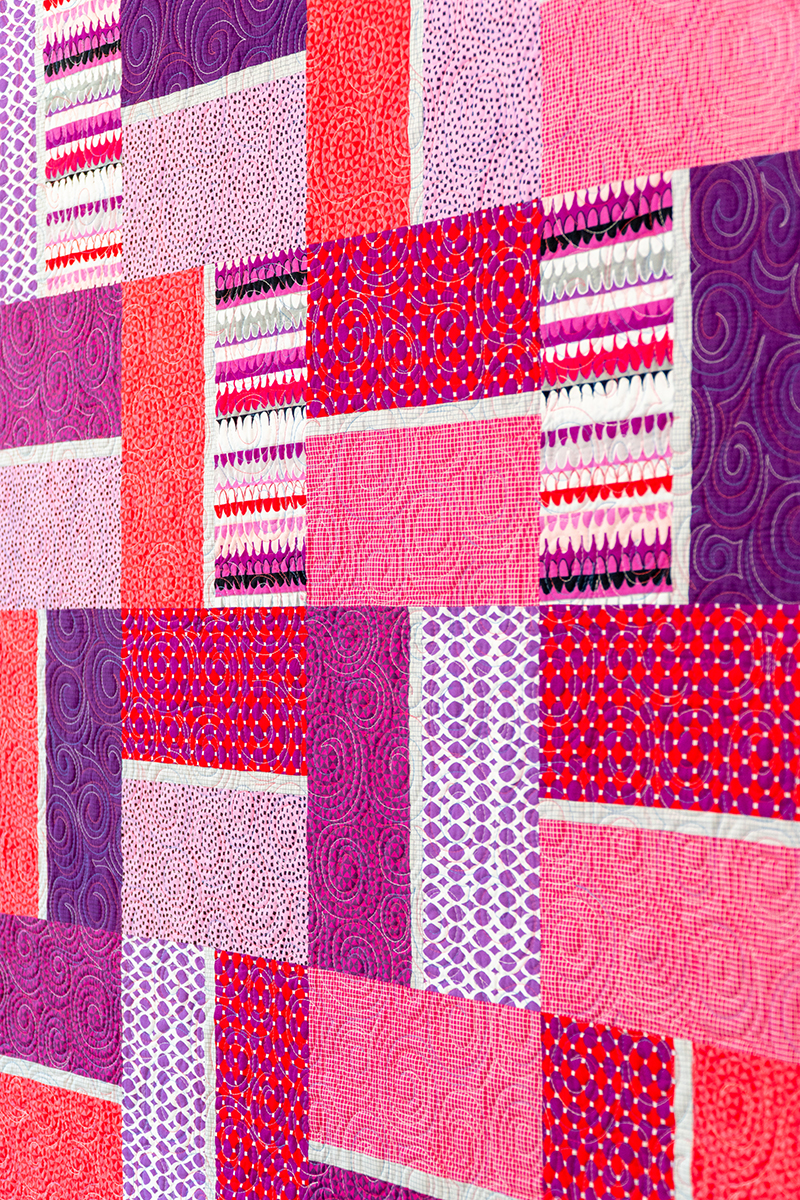
The variegated thread color above is actually a combo of red, white and blue but it looks pink and purple when quilted on the Amethyst quilt!
Because these quilts are so bright and colorful, I decided to quilt them using 3 different colors from my Aurifil Variegated Thread Collection. I’ve really been enjoying quilting with them because they add a bit of whimsy and sparkle to my busy quilts! Whenever I pick colors, I audition the thread by placing the spool on top of the fabrics to see how it will blend in.
Variegated thread on the Breeze colorway in progress!
It’s often surprising how well a thread will blend in even if the colors aren’t an exact match to the fabric. I normally use the same color it top and bobbin and don’t worry about whether or not the same colors will line up perfectly – that’s an impossible task. But with the variegated colors, any imperfections are hard to see and that makes for stress free quilting!
The black and white will add an extra dimension to this modern color palette!
Choosing the Quilting Designs
Because I was in a hurry to make these quilts for quilt market last fall, I didn’t have a whole lot of time to finish them. I pride myself on quilting my own quilts because (1) that’s my favorite part and (2) I’m a little bit of a control freak. So I knew I had to choose designs that would look great and wouldn’t take too much time.
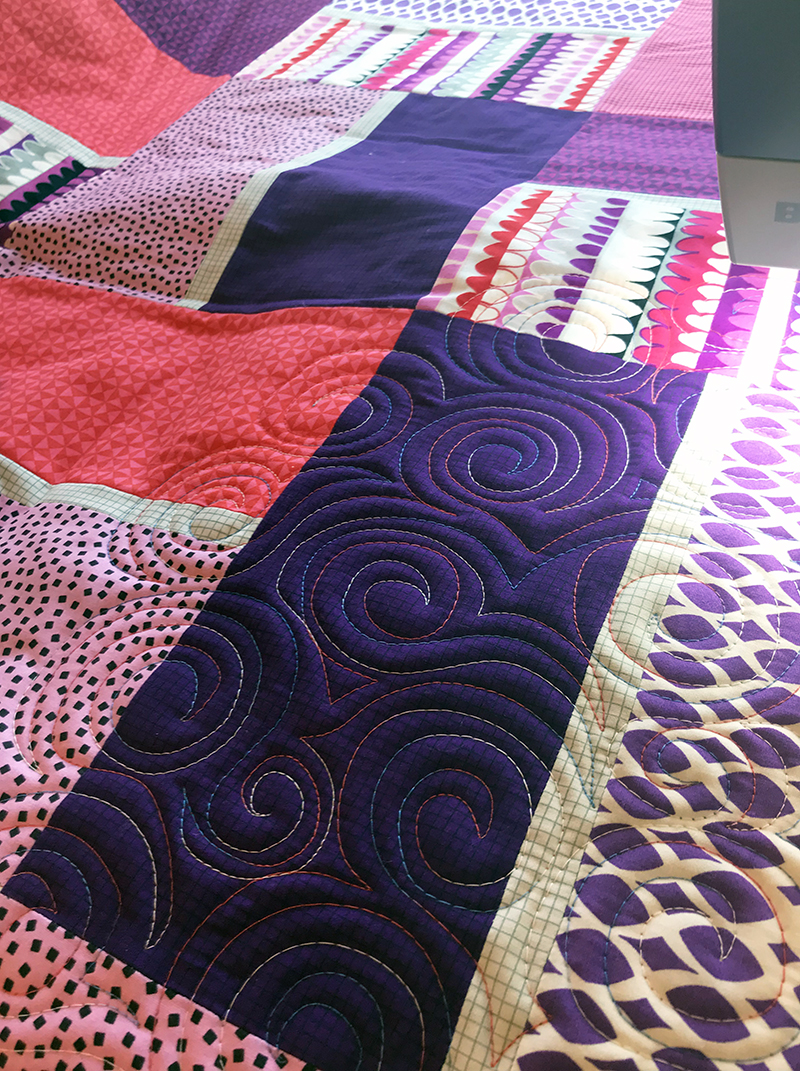
Swirls in progress on the Amethyst colorway. Don’t stress about the imperfections!
Also, I wanted these quilts to do double duty. Not only do they showcase my Gridwork fabric and Terrace Tiles quilt pattern, they also are examples of 3 different motifs I teach in my machine quilting workshops: Swirls on the Amethsyt colorway, Boxes on the Breeze colorway, and Jagged Stipple on the Citron colorway.
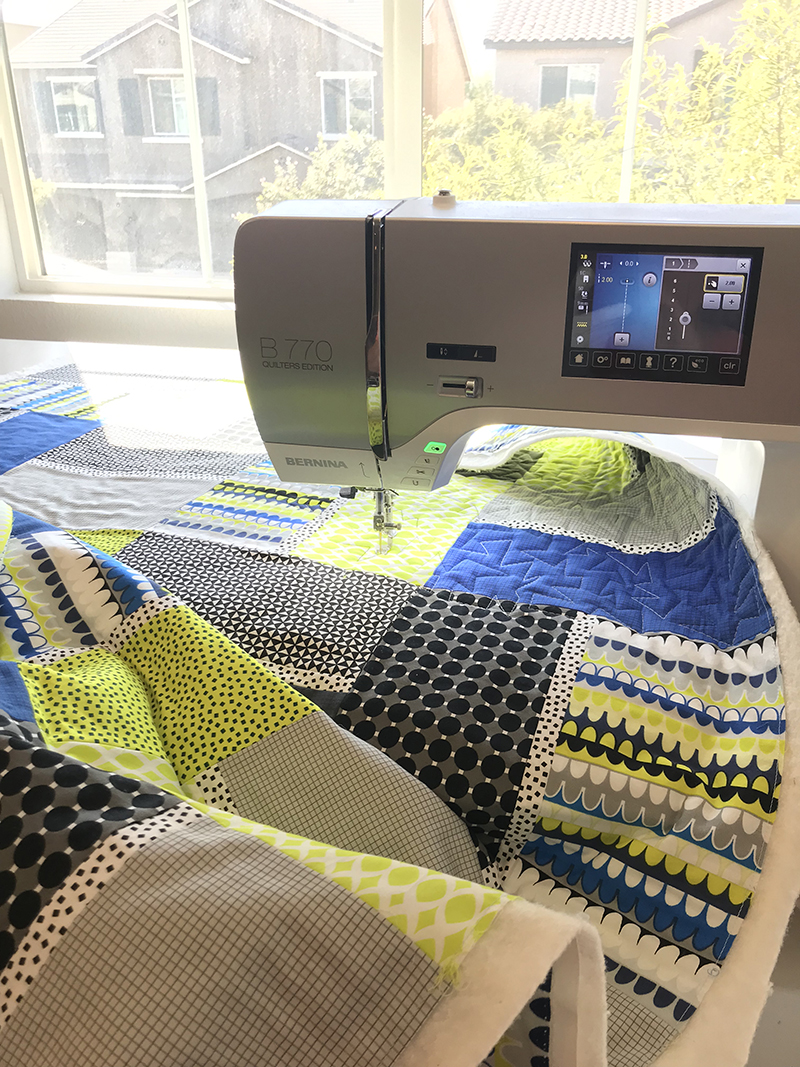
Boxes on the Breeze colorway is one of my favorite modern machine quilting designs.
The fastest and easiest way to finish a quilt with free motion is to choose one design and quilt it from edge to edge across the quilt regardless of the pieced quilt design. It’s also a forgiving way to hide wonky or irregular seams. Just focus on one block at a time, and before you know it, the whole thing is finished! Another way to speed up the process is to quilt the motifs on a larger scale, because that takes up more space in less time.
Jagged stipple is my modern, angular version of it’s traditional cousin, smooth curving stipple.
Just to give you an idea of how fast these designs are to stitch out, it took me about 3 hours to quit swirls on the baby size Amethyst version, 5 hours to quilt boxes on the throw-sized Breeze version, and 2 hours to quilt jagged stipple on the baby sized Citron version. Although the Citron quilt is the same size as the Amethyst, jagged stipple is a much looser design than swirls, so it was a bit faster.
Scrunching and Smooshing the Quilt
Because I do everything on a sit down machine, it’s important to control the weight and bulk of the quilt. I still have yet to find the perfect quilting table, so this is what my hacked together set up looks like below:
I got this table for a song 20+ years ago and sadly I don’t even remember the brand!
My sewing machine is flush with the bed of the table so it can hold most of the weight. It’s pushed against the wall so the quilt won’t fall off the back of the table. Most of the bulk is to my left, and I’ve placed a TV tray forming an L shape to hold more of the quilt as I scrunch and smoosh it through the machine. I also have a comfortable ergonomic chair that I can roll around easily.
A larger throat space on my machine makes a huge difference when managing the bulk!
On a bright sunny day I like to look out the window which gives me lots of natural light while I’m sewing and quilting! When the quilt falls into my lap, I just scrunch and smoosh it out of the way as needed while I quilt.
I hope this helps you overcome your fear of free motion when choosing and allover textural design like this. The key is to fill in all the spaces, so your eye doesn’t notice any of the imperfections.
See it on Video!
Here’s a YouTube video I made showing me actually fee motion quilting each quilt. The video is just under 8 minutes and it’s packed with tips as I quilt each of the 3 quilts shown above. I’m stitching in real time with the volume on my machine so you can see and hear what it looks like “in real life.” Notice how much I stop and reposition my hands:
Scrappy Binding
Sew the leftovers together randomly for a fun, scrappy binding!
I love a scrappy binding, especially when making quilts from fat quarters. For Terrace Tiles, you just use up the leftovers and piece them together randomly to carry the colorful chaos all the way to the edges of the quilt.
You can join the ends on an angle or edge to edge!
I prefer to cut my binding strips 2″ wide so they finish nice and narrow and are even on both sides. I press each of the seams open to reduce bulk and make sure the binding is long enough to go around the entire quilt with a few inches extra.
Another great thing about scrappy binding is you can always add more strips!
Although I prefer the look of hand binding, machine binding is a great way to finish fast! Here are my two favorite ways to bind, either by hand or machine:
Remember, if you make your own version of this quilt, please share. You can use #terracetilesquilt on instagram, or you can share your progress in my ChristaQuilts Facebook group. I’d love to see it!!
Are you planning on learning to foundation paper piece in the new year? With my Pieced Primrose pattern, learning this skill is much easier than you’d think!! Be sure to let me know in the comments if you’ve done paper piecing before, or if this will be your first experience with it.
The fun begins on Monday, January 6th with weekly posts to keep you on track for finishing by the end February. But you can still work at your own pace, and I’m here to cheer you on, no matter how long it takes!
Next week’s introductory post will talk a little bit more about the tools and supplies and general foundation paper piecing tips. Then we’ll dive into cutting the following week, so you still have plenty of time to gather your fabrics and supplies.
We’ll take extra time to piece the blocks and will finish up with basting, machine quilting and binding. After all, if you’ve done a quilt along with me before, you know how much I detest these three little words, “quilt as desired!”
Pieced Primrose shown in the Cool colorway of Abstract Garden above.
Pieed Primrose shown in the warm colorway of Abstract Garden below.
My Pieced Primrose quilt pattern is super versatile and you can sew up as many blocks as you like with several different layouts. And it looks fabulous in ANY fabrics you choose to use. So I hope you’ll join the fun and consider me your cheerleader for “Start to Finish” quilting!!
The Color Weave quilt pattern was so popular that I recently reprinted it and added bonus cutting instructions using fat quarters. Now I want to remake it using Geo Pop fat quarters:
Can you sense a theme here? I really do love working with precuts because it get to use lots of colorful prints in my quilts!
This pattern is from my book, Piece and Quilt with Precuts. I had written and published the book before I started designing fabric. But once my first line, Modern Marks came out, I wanted to remake many of my earlier designs in my own fabric! Many of these fabrics are now out of print but I stocked up on the charm packs because I knew they’d be a hot commodity!!
This is another quilt I loved so much that I had to make it twice! I was thrilled that I got to showcase the Abstract Garden version of the quilt at QuiltCon 2019 and of course it’s always a great pic when I can match my outfit to my quilt!!
I made the first version from Modern Marks and as you can see the colors are very similar. I actually used the same blue background fabric for both (Modern Marks Herringbone Navy) but due to the lighting it can look very different!
Dot N Dash Quilt – From Piece and Quilt with Precuts
Facets was my first exploration of improv piecing and such a game changing quilt for me. It was the first time I placed in a national quilt show, and the very first pattern I designed for my very first book. It was also the first time I curated a collection of fabrics to achieve a certain look. I had collaborated with another fabric company at the time, not realizing that my penchant for bright colors and bold shapes would lead me to where I am today.
I hope you’ve enjoyed seeing just a few of the quilt alongs I’ve hosted. Click here for my entire quilt along archive. Leave me a comment if there’s a particular design from one of my patterns or books that’s you’d like to make. I’m always planning for future QAL’s and would love to help you along the way!
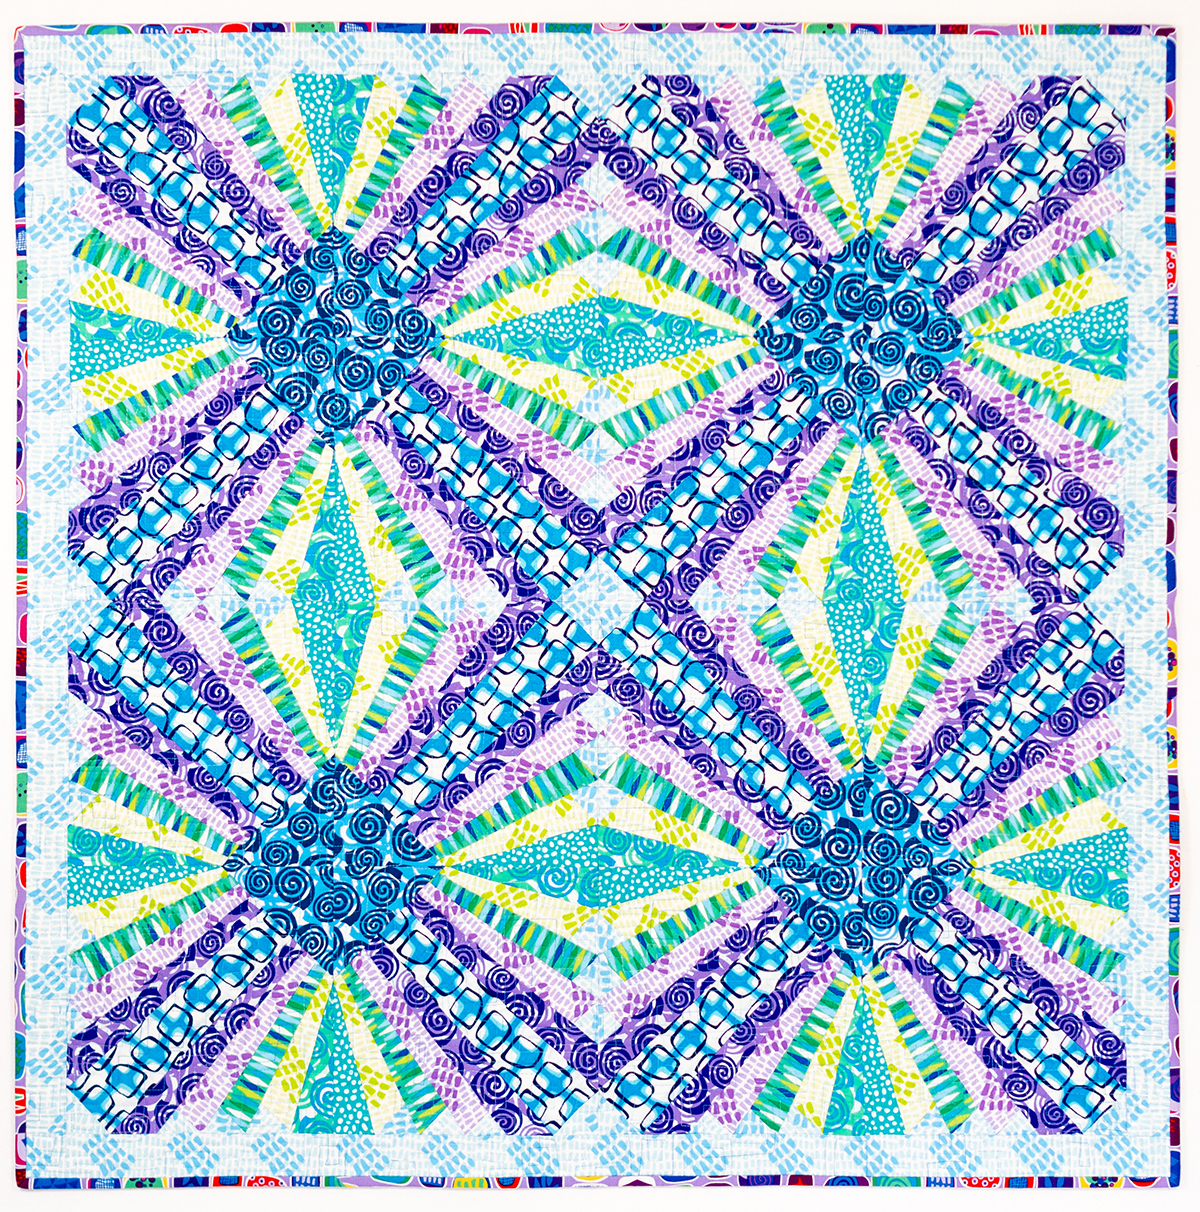
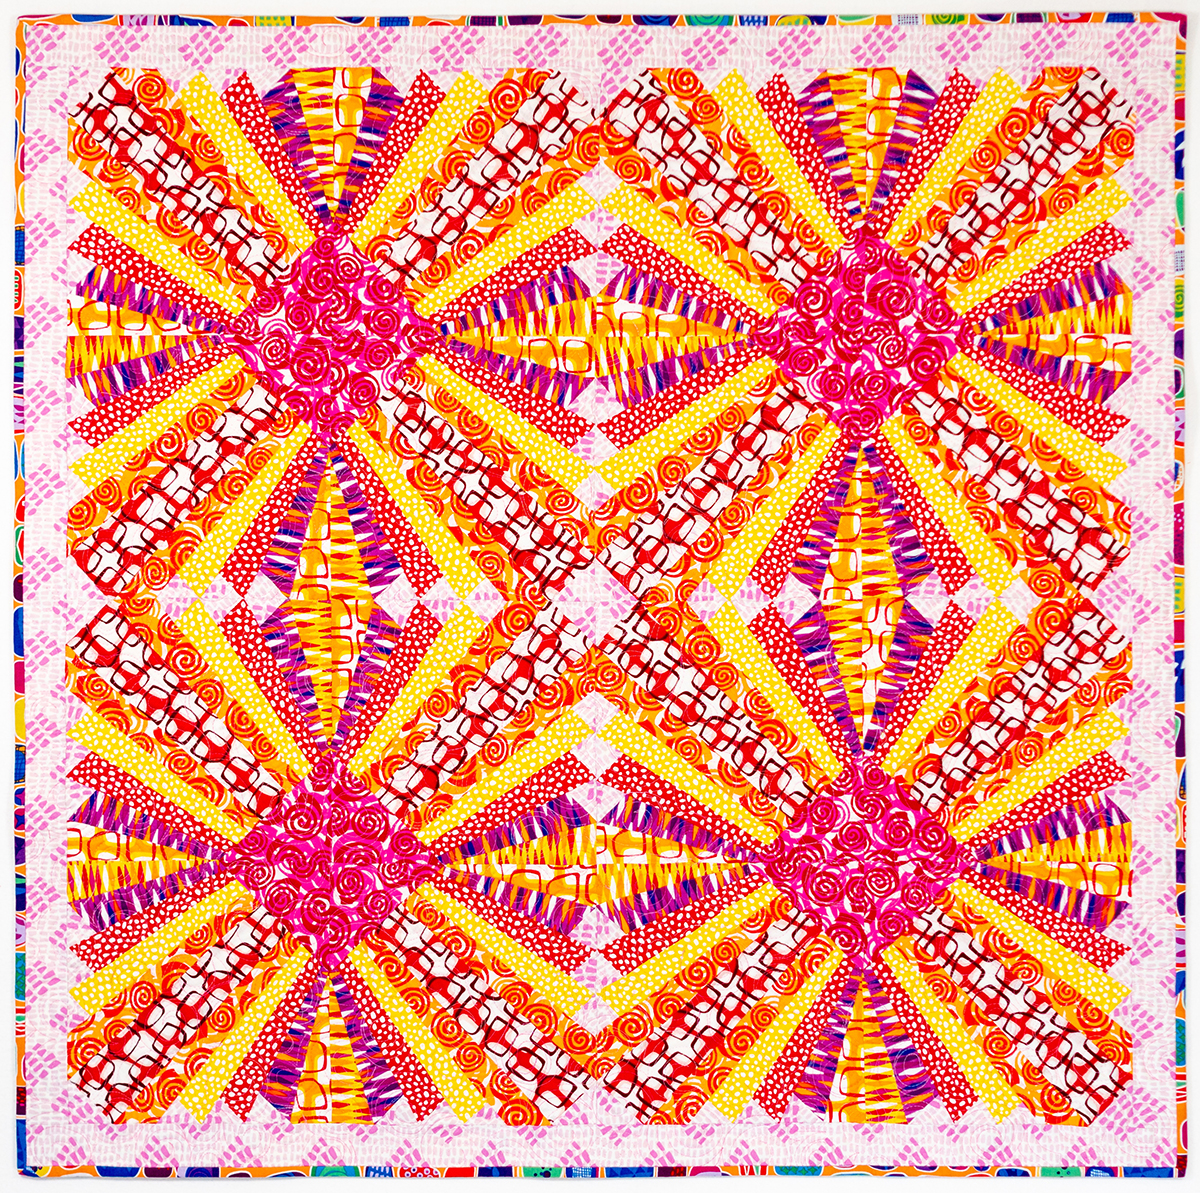
I’m so excited that my newest fabric, Gridwork will be arriving in stores soon! To get you pumped up for some post holiday sewing, I’m sharing some gorgeous quilts made by my talented friends. Hopefully you’ll be inspired by one of these designs and put them on your “to make” list in the new year!
The simple Gridwork quilting on this version gives it a completely different look, but it’s still very effective, don’t you think? And of course I love that it fits in with the theme of the fabric, too!
Mid Mod by Charisma Horton
I’ve recently gotten to know Charisma Horton online and her work is just fabulous! She has a great eye for modern design and is a prolific long-arm quilter, too. I love this composition that she created from Gridwork, called Mid Mod.
If you love jelly roll quilts as much as I do – check out the new Colourwerx Paintbox quilt below. It’s made from one “Strip-pie” of Gridwork plus background fabric – easy peazy!!
This striking design is made from Gridwork fat quarters + background fabric. I love how it shows off the prints and they look great all mixed up together!
I sure do love having talented friends that create some amazing patterns with my fabric!!
Now it’s your turn. Once you grab your favorite Gridwork prints and start sewing with them, please share your progress with me. You can post pics in my Facebook group, or you can share on instagram with the hashtag #gridworkfabric. I can’t wait to see what you make!
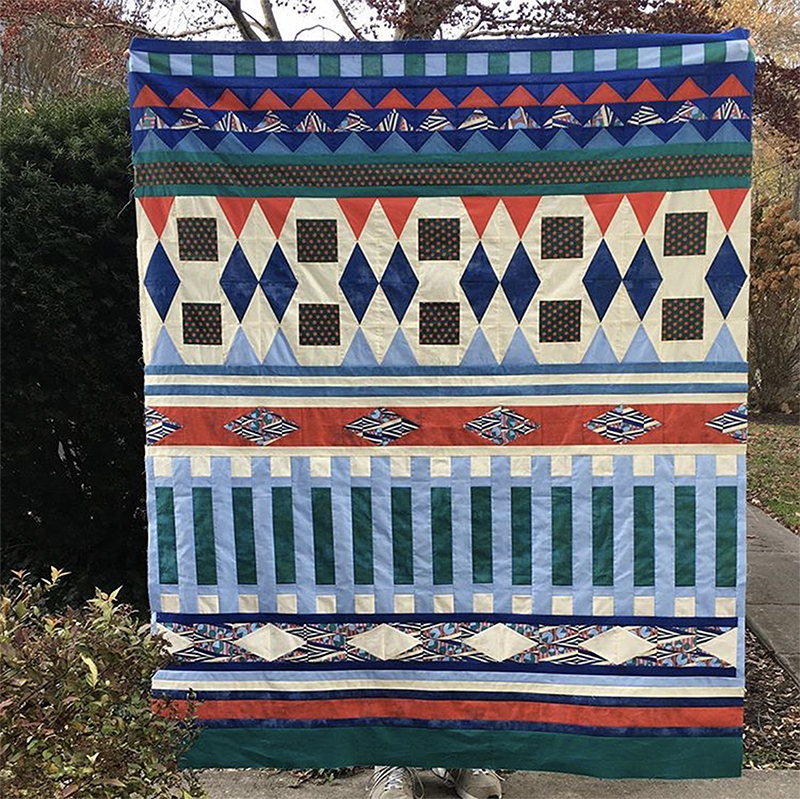
Earlier this week, I shared my Infrastructure quilt finish, along with links to all of the quilt along tutorials. Today I’m back with more inspiring versions of this quilt made by others. I love to see the same design made up in different fabric, don’t you??
My version of Infrastructure quilt made with Geo Pop fabric.
Heather Black’s Version Made from Solids
Heather Black originally designed this quilt for me to show off my Geo Pop fabric line. But then she made her own version using Benartex Superior Solids. The color placement is basically the same, but the solids really allow her amazing machine quilting to shine!
Whenever I do a quilt along, I always emphasize that I want everyone to work at their own pace. But it was really fun to follow two of the participants on Instagram as they kept up each and every week. Check out their beautiful versions of Infrastructure below:
This lovely quilt top was made and shared by Margaret Fleisher on Instagram. I love her color choices and clever use of fabric. Now I’m excited to see how she quilts it!
If these have inspired you to make more quilts in the new year, be sure to check out my quilt along web page. It’s a roundup of all of the quilt alongs I’ve done so far. You may just find the perfect quilt you’ve been looking for!
Happy Thanksgiving everyone! This officially kicks off the holiday shopping season, so I figured I’d join the crowd of business owners and get it on the Black Friday frenzy! From now through the end of the month, you can save 20% off all of my fabric lines by the yard, when you use code TURKEY during checkout at shop.ChristaQuilts.com.
It was such a thrill when Benartex contacted me three years ago and invited me to become one of their fabric designers for their Contempo division which features modern and contemporary prints. They told me they loved my work and would love for me to infuse my funky geometric style into fun colorful fabric. Modern Marks was the result and it’s been a wild ride ever since!!
I still have a bit left of each of the 26 Modern Marks fabrics, and most are now out of print. As you can see below, all of my groups mix and match and are a riot of color and texture!
I continued to fill out the rainbow in my fabric stash with this line, and decided I needed not one, but two background grays to go with them. Because Benartex reprints hot selling fabrics, the grays have been printed over, and over, and over again. They are literally, the “perfect” neutrals!!
Fun fact: most people mistake the word Fandangle with “Fandango“, but hey have two completely different meanings. Fandango is the dance, but Fandangle means decorative ornamentation – which is why I included fun fabric names like Beaded Curtain, Triangle Trinkets, and Baubles and Bits. Sometimes naming the fabrics is as much fun as designing them!!
With this group, you can separate them into warm and cool, but as you can see above, each print looks great with every other piece in the line. I have yardage of all 20 bolts of Fandangle available, and with this special deal, you can stock up on your faves!!
Can we say purple?? With each line I create, I want it to stand on its own as a complete color story. But, I love adding new things that will mix and match with what came prior. In Abstract Garden, I made sure to include purple, plus four great pastels that would serve as light, or “low volume” backgrounds.
Abstract Garden consists of 20 prints, many of which are loosely based on some of my favorite machine quilting motifs. The name is a tongue in cheek nod to the fact that I can’t really garden, OR draw floral motifs. Be sure to check out the signature print of the line, “Raised Beds.” It’s little plots of my most favorite geometric shapes!!
With four fabric collections under my belt, I decided I really needed a line of modern basics. This is my largest line yet at 25 pieces, but with only 4 different prints. I’m thrilled that I was able to include more neutrals – plenty of black, white, and gray in this group to go along with the bright saturated colors.
With Geo Pop, you can have fun fussy cutting the geometric stripe, and can create some really cool effects with the eye catching Mosaic Dots print.
Shop, Save, and Share!!
For your viewing pleasure, here’s my stash of all four collections that I’m offering for sale by the yard. I keep these in my overflow fabric room, I mean guest room!!
When you create with my fabrics, be sure to send me pics or tag me on social media using @christaquilts or #modernmarksfabric #fandanglefabric #abstractgardenfabric and #geopopfabric. I absolutely love to see what you create!!
Don’t forget to use code TURKEY at checkout to save 20%! Shipping is a flat $5 to the US, and I’m happy to refund excess International shipping charges, too!!
I love it when I see my fabrics popping up at quilt shops all over the country (and the world).
Each season I get an updated list from Benartex of who carries my current fabric and I’m happy to share it with you. Keep in mind this doesn’t include international shops, or those who purchase from a distributor. No does it include those who have the fabric on order but haven’t yet received it. But at least it gives you a start at finding out where to buy. If you know of any shops NOT on this list, please let me know and I’ll be glad to add them!
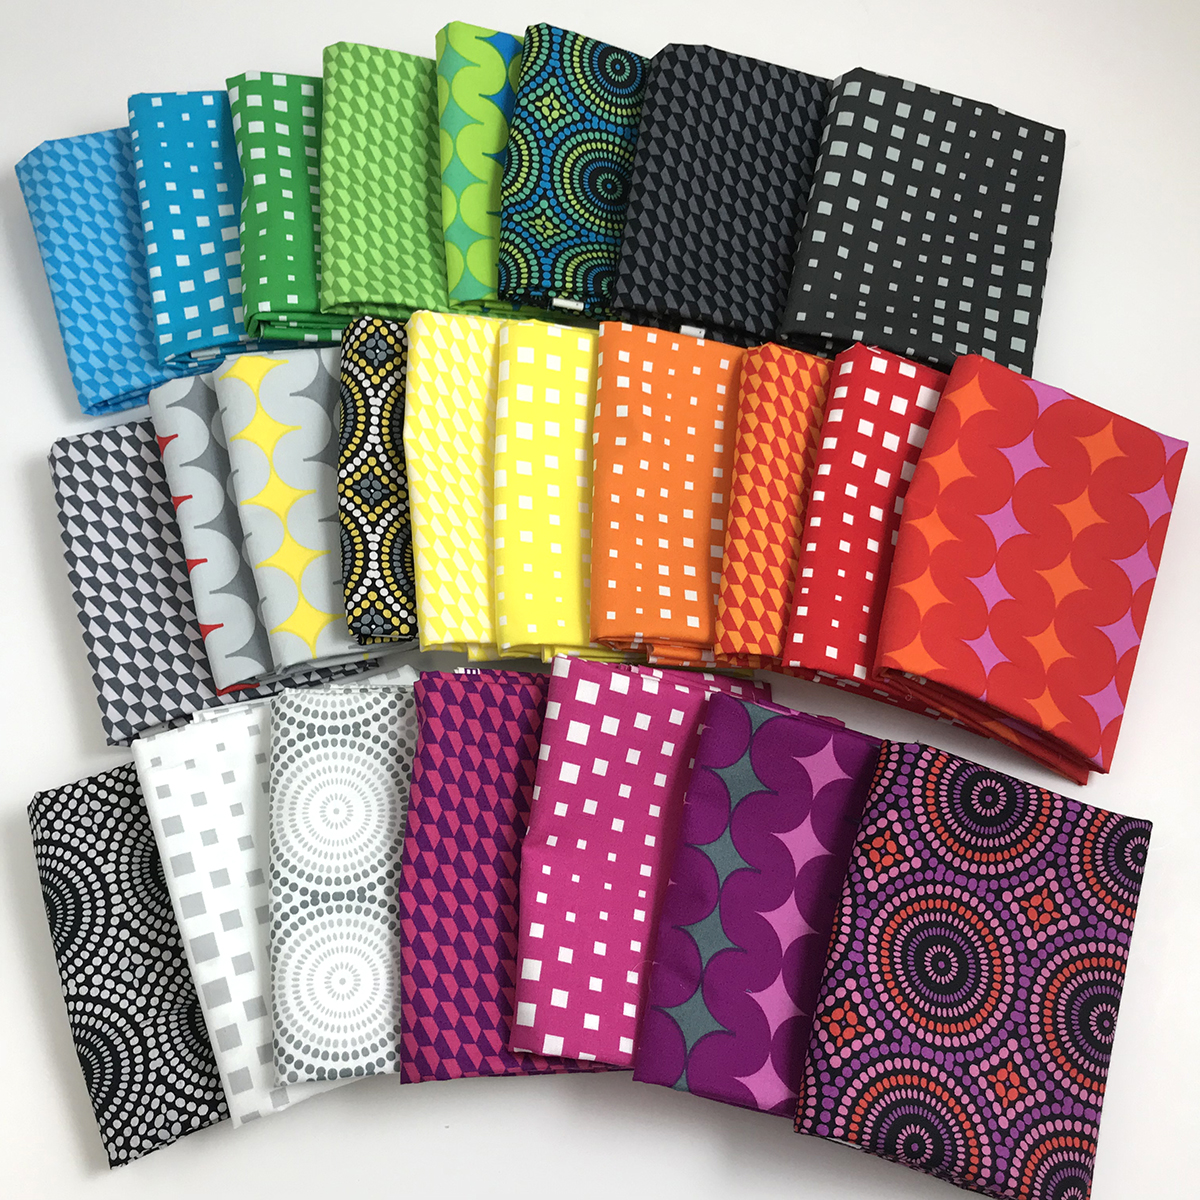
Geo Pop is my 4th fabric line, with 25 geometric skus in bright rainbow colors.
Geo Pop Shops!
Click the links below to go to their site or contact them for more info: